A constructive post - tying assist hooks
Hi guys, I like to make my own assist hooks, and usually when I have some free time I make up a big batch that will last me for the year. With the long weekend, and me running on low inventory, it was time for this again.
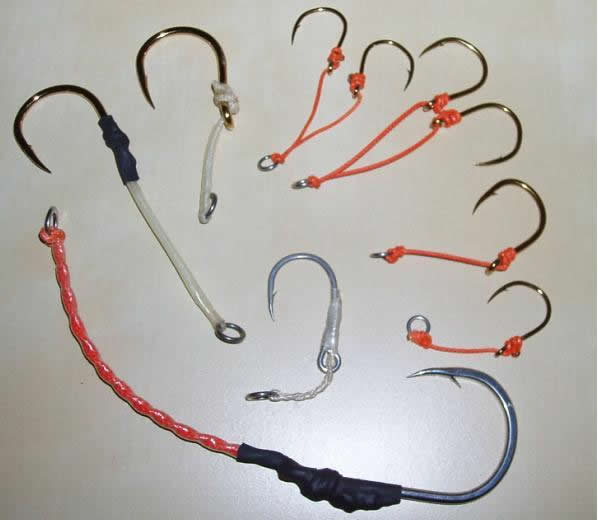
There are infinite ways to tie them; I've experimented with a few and stuck with those that I find easy and clean to tie and which I have confidence in. I use a common method for my big assists (size 7/0 to 13/0). However for my smaller hooks used for light jigging, I prefer a different, less bulky method as the hooks are alot smaller. The assist cord material is also thinner and less stiff, allowing knots to bite in better. When I sat down to do this a few days ago I couldn't remember the method very well (doing it irregularly), but when I went online to refresh my memory I couldn't find my usual website! I had to sit down, cut up a couple of old, dead ones and piece it back together. So I won't forget again in the future, I thought I'd post it up for my reference here, and also for anyone else who's interested.
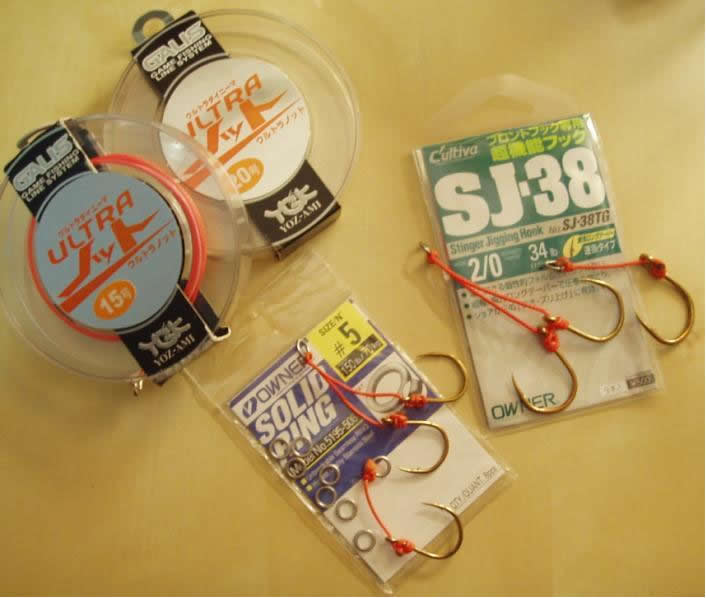
--- STARTING MATERIALS: In this case, I'm making assists for my 120-200g jigs (PE4). You need some solid rings (Owner size 5), some kevlar (YGK No. 20 - 190lb), and some hooks, in this case Owner SJ-38 size 2/0. You will also need a pair of scissors, a lighter, and a pair of pliers (preferrably long nose). You can also touch off each completed knot with a dab of superglue, but I've found it unnecessary.
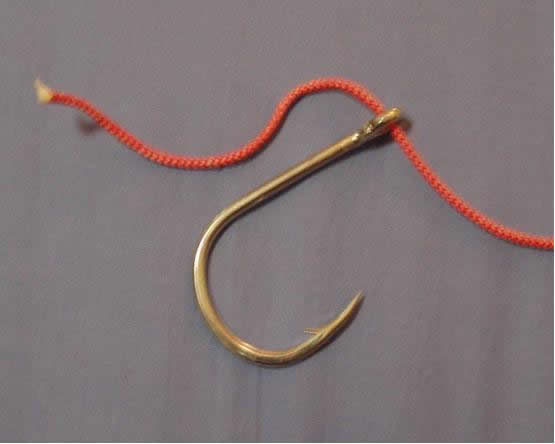
I'll use a proxy hook and kevlar in the steps; its just much bigger so you can see what's going on.
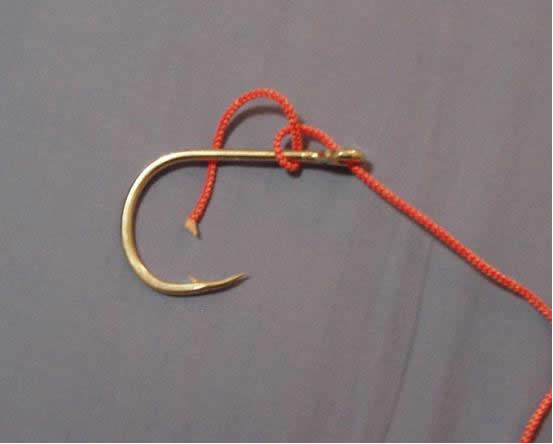
--- STEP 1: Thread the kevlar through the eye of the hook, front to back, as shown (excuse the blurry pic)
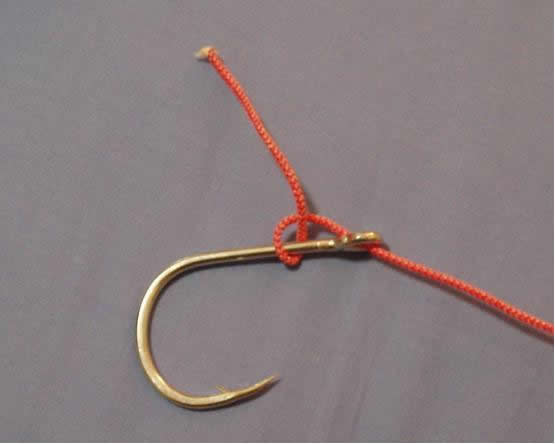
-- STEP 2: Loop the kevlar around creating a half-hitch. The direction is important.
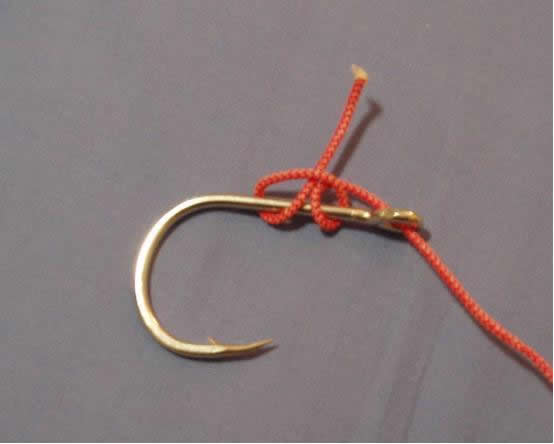
-- STEP 3: Loop the kevlar around the shank of the hook again exactly as shown.
-- STEP 4: Pass the tag end through the loop to create a half hitch in the opposite direction.
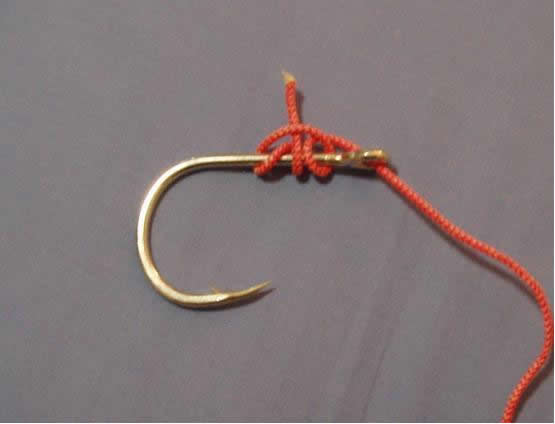
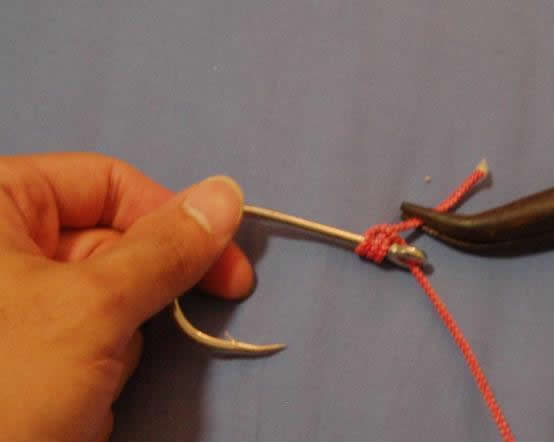
-- STEP 5: Loop it around the shank one more time in the same direction as STEP 4, creating another half-hitch.
-- STEP 6: Use pliers to tighten one end in the direction shown.
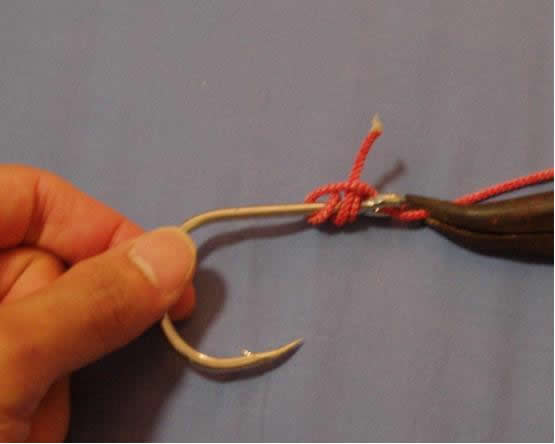
-- STEP 7: Now tighten the other end, again using the same method as shown.
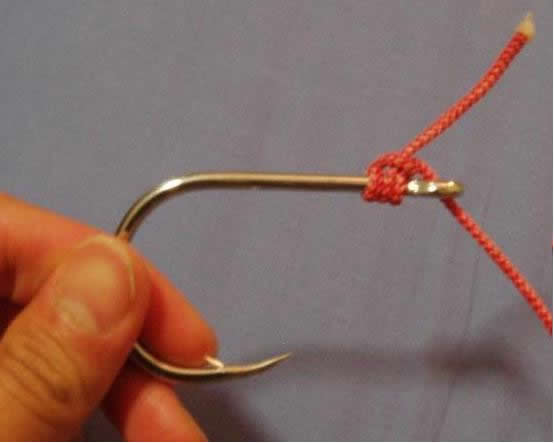
-- STEP 8: You're done! Trim the tag end down to about 10mm, and burn the tip off with the lighter. While its still molten and hot, press it down with the butt of the lighter to squish it into a 'mushroom head'. This will act as extra insurance that the knot does not slip.


Kasey L.
Posts: 1390
Date Joined: 02/03/06
Now for the split ring. This
Now for the split ring. This is easy too, and the reason it looks like alot of steps is because I've really broken it down to as simple as it gets.
Again, I'm using proxy kevlar and ring.
STEP 1: Thread Kevlar through ring. Told you it wasn't that hard.
---
STEP 2: Loop the Kevlar through the ring once more.
---
STEP 3: Now loop the end around the original leg of Kevlar once as in the following two pictures:
---
STEP 4: Now do a second loop. To finish it off, thread the tag end through the original two loops where the split ring sits. I think the picture describes this alot better.
---
STEP 5: Tighten with pliers.
---
STEP 6: Cut tag end off, burn, squish, and done! Time to go out and catch fish....
Mainey
Posts: 177
Date Joined: 17/09/10
I want to make some
when I look at "STEP 6: Cut tag end off, burn, squish, and done! Time to go out and catch fish...." it appears to show the line and the hooks both connected to the same "O" ring at the same end of the 'weight' ?
Is this the way they are made, was thinking the hooks would be on the other end ?
Please be kind, as I've never seen a jig b4 in my life, only heard of them.
Maîneÿ . . .till
Posts: 9358
Date Joined: 21/02/08
Well, as you can see from
Well, as you can see from the image, it works!
In some other places people tail rig, but it just increases your snags, not your catches.
Alan James
Posts: 2300
Date Joined: 30/06/09
I think some would disagree Till
based on a recently posted pic of a jig capture front and tail rigged. Yes it will increase your snags but not necessarily your catches.
till
Posts: 9358
Date Joined: 21/02/08
Sorry I can't really work
Sorry I can't really work out what you're trying to say.
Last time I saw someone post a picture of a head and tail rigged lure, they had two rat sambos on. Thats neither more fish, or no better a catch than Whitey's recent double of a baldy and a dhufish, yet it had an increased chance of snagging.
dogsoldier
Posts: 943
Date Joined: 04/11/05
Excellent article thereKasey
Excellent article thereKasey that will help a lot of members,you are the obi one of jigging
Live to fish
Andrew
Adam Gallash
Posts: 15665
Date Joined: 29/11/05
Top post Kasey
Top post there KC, some really good info for those that want to save some coin and do it themselves. Those knots are really easy to do, will certainly keep this thread in mind for future reference. I've also sticky'd it to the top for anyone that hits the jigging forum, great work mate.
Cheers,
Adam
Site Admin - Just ask if you need assistance
Maverick
Posts: 1263
Date Joined: 06/06/06
question's
WHY tie Kevlar to a split ring why not a loop and use split ring pliers ??
Also will this work on hooks without welded eyes , will the kevlar rub on the end of the eye and damage the kevlar ???
EX Recfishwest member 291
NEW Oatsfishwest member 291 .
OFW member 088
Sponsored by no one and I work for myself so my comments are my own.
Kasey L.
Posts: 1390
Date Joined: 02/03/06
Good questions Mav. It
Good questions Mav.
It should be a solid ring, but the biggest solid ring I have doesn't look very big on camera. I was using a 300lb split ring for demonstration only, as it is bigger. Please use solid rings; I should have made a bigger note.
Those hooks without welded eyes which I have rigged up this way have yet to give me problems. Kevlar has very high abrasion resistance, and usually it is from teeth and and other much abrasive, rasping fishy bits which eventually cause me to change the cord.
I've had the kevlar survive through dhuies and pinkies chewing on it without a problem, so I am quite confident that hooks without welded eyes are not an issue.
Colin Hay
Posts: 10407
Date Joined: 23/10/07
This is gold Kasey
Thanks for al your efforts. You certainly explaied it all well.
Moderator. Proud member of the Fishwrecked "Old Farts". Make sure your subscribed to Fishwrecked Reeltime http://fishwrecked-reeltime.com/
colin449
Posts: 21
Date Joined: 26/10/07
Niceone - Clearly you need
Niceone - Clearly you need to write a book.
blowy
Posts: 124
Date Joined: 20/03/08
top post
wow top post have never even jigged myself and im thinken with that post as a refrance even i could have a go
Salmo
Posts: 913
Date Joined: 15/08/05
Nice post mate
Nice modified shank knot....I got one to show you sometime.
I cant see the pictures in the solid ring section either.....
Kasey L.
Posts: 1390
Date Joined: 02/03/06
Finally all fixed I
Finally all fixed I think.
Andrew: Did any of you boys pull fish that morning? could tuesday be 'sometime'?....
Kasey L.
Posts: 1390
Date Joined: 02/03/06
Yes; its clear heat shrink;
Yes; its clear heat shrink; and pretty easy. Easiest to just pass quickly back and forth over a lighter flame.
Kasey L.
Posts: 1390
Date Joined: 02/03/06
Thats ok, I'm sure others
Thats ok, I'm sure others want to know too.
Heat shrink can be easily obtained from DIY or electrical shops I imagine. A generous mate who's a sparky gives me a supply.
Maverick
Posts: 1263
Date Joined: 06/06/06
Heat shrink
Best wat to do heat shrink is with a hair dryer, hot enough to mely the shrink tube not hot enough to affect the kevlar .
EX Recfishwest member 291
EX Hotbite member .
NEW Oatsfishwest member 291 .
OFW member 088
Sponsored by no one and I work for myself so my comments are my own.
Bluetonic
Posts: 1147
Date Joined: 09/01/08
Sometimes it pays to look
Sometimes it pays to look over old posts. This is very educational!
Blue Sky! Blue Water! BLUETONIC
Blue Sky, Blue Water, Bluetonic!
wadetolley
Posts: 2258
Date Joined: 27/06/08
great post mate
Great post mate! Must of took a fair bit of time to put that all together....cheers "thumbs up"
IF YOU EVER NEED A LIMOUSINE...CALL LAKES LIMOUSINES BALLAJURA
MOBILE 0416341256 OR PH 92496113
Alan James
Posts: 2300
Date Joined: 30/06/09
Why kevlar?
As very much newbie to jigging I note that the practice appears to be to use kevlar to attach the assist hook(s). In another thread Ryan favours a single assist hook due the tangle problems with two assist hooks. Twin hooks could be rigged using heavy mono or wire in such a way that tangling hooks "should" not occur.
Is the softness of the assist line important?
Ryan Thipthorp (not verified)
Posts: 16
Date Joined: 01/01/70
assists!
Kevlar is very suitable for demersal jigging assist's.I use two hooks on shallow water jigs (ie up to 100m) but equal length and the assist length is shorter due to shorter jigs!
Tangling issues was only with deepwater eratic/antaganistic jigs hense the one hook assist. You can use more heat shrink, use lacky bands or even use tape to hold the assist to the jig body. This helps reduce these issues but i've cut back to one assist to do away with that issue all together!
Alan James
Posts: 2300
Date Joined: 30/06/09
Assists
OK I understand. My query was more related to the deep water jigging although I didn't say that. If tangles weren't an issue would your preference be to use two assist hooks?
Ingnoring connection issues (knots / crimps) is assist material stiffer than kevlar seen less effective wrt hookup rates?
Ryan Thipthorp (not verified)
Posts: 16
Date Joined: 01/01/70
Query
With this jig, tangling is an issue so ill stick to one. If i can get away with two and no issues then yes doubles would be suitable but not essential.
If two was to be used then equal length (my pref). I've had a look at what other deepwater jiggers do around the world and many use singles and prefere that!
Kevlar material with heat shrink to stiffen is good!
aquagenes
Posts: 223
Date Joined: 28/10/08
Nice one Kas, Got to have a
Nice one Kas,
Got to have a few beers and start rigging my jig Out fits give it a crack.
Cheers Aquagenes
Dale
Posts: 7930
Date Joined: 13/09/05
I'm a bit new to this and
I'm a bit new to this and want to try it out now I've got my new rod from Oceanside and my reel spooled. How do you secure the ring to the jig if your using solid rings? What size hooks should I be looking at? Only looking at 100 - 120g jigs at this stage as I dont think I'll be fishing any deeper than what what we have down this way around the cape etc.
Cheers
Dale
"Just because you are a Character, Doesn't mean you have Character."
Mr Wolf
chrisp
Posts: 1217
Date Joined: 24/05/08
Split ring
Attach your solid ring to your jig via a split ring dale.If you dont have any best to grab some splt ring pliers from your local tackle store.Hook sizes for the jig sizes you mentioned.I use 2/0 - 3/0 owner sj-38 as pictured in Kaseys post.
cheers
chris
Tim
Posts: 2497
Date Joined: 26/09/06
Bump
Updated for relinked pics in the thread.
Ben Derecki
Posts: 1926
Date Joined: 10/10/07
Thanks for fixing it up Tim
I got some YGK Dyneema today to give tying my own hooks a shot but the dude in Oceanside couldn't tell me what weight #40 was, actually sorry he did estimate it being around 160kg. I took a punt that given it was the only weight they had in stock there it would be heavy enough for tying for sambo jigging.
Just had a look on the the JDM website and they've put it at 130kg (I think it's the same gear), can anyone confirm a) the weighting; and b) whether that would be suitable or whether to go heavier?
Kasey L.
Posts: 1390
Date Joined: 02/03/06
#40 is PE40. Usually if you
#40 is PE40. Usually if you flip it theres a scale at the back of the dyneema. Otherwise, try and google a scale for dyneema breaking strains at PE40
Ben Derecki
Posts: 1926
Date Joined: 10/10/07
Thanks heaps KL. Did have
Thanks heaps KL.
Did have a read of the back but the info that I could interpret wasn't particularly helpful. #40 and 4.5 were the only two things I could make out.
499
Posts: 181
Date Joined: 07/12/08
can the mods make this a
can the mods make this a sticky
great thread mate
Mainey
Posts: 177
Date Joined: 17/09/10
reread this post now after starting to get gear ready
Question:
could you put a single hook at EACH end of the 'weight' OR sigle at one end and double at other end ? ?
I understand the hooks 'jag' the fish as it investigates the 'weight' - so more hooks would be benificial
Maybe even a quality 3 gang hook at the bottom of the 'weight' with the 2 single hooks at the top would increase hook-ups ??
( is that legal )
Maîneÿ . . .till
Posts: 9358
Date Joined: 21/02/08
Its not (usually) jagging,
Its not (usually) jagging, they are trying to eat the weight when you hook them.
They tend to strike at the head end, so no need to put hooks at the other end, except on very small, or very long, jigs.
Excess hooks just lead to damaging fish and much higher likelihood of getting hooked up on the bottom instead.
You would never rig sambo jigs with hooks at both ends, or even twin assists, because you're so likely to get more than one fish.
Mainey
Posts: 177
Date Joined: 17/09/10
Thank you :)
Thanks
that now make sence to me
Maîneÿ . . .Moist and Salty
Posts: 102
Date Joined: 28/10/14
While I agree that you
While I agree that you should minimise the number of hooks when sambo jigging I tend to disagree about the bottom assists causing more snagging.
In my experience if I'm going to get snagged it'll happen anyway no matter the hook assembly as it's mostly due to a ledge and not the bottom.
The inventers of jigging in Japan use double assists on both ends of their jigs to ensure more hooks share the load to decrease the chance of breaking hooks and/or having hooks pull through the lip or skin.
But confidence in your gear is the main thing when putting the jig where the fish are, so it's more important to be happy with what you're using so each to their own
catchalittle
Posts: 1875
Date Joined: 04/09/08
Great article and from some
Great article and from some of the pictures Ive seen of his catch's he would be a wealth of info and a great deckie
Nathan
t bone
Posts: 351
Date Joined: 20/04/14
thanks
very helpfull to a noob at jigging for sure :) cheers...
Jackfrost80
Posts: 8157
Date Joined: 07/05/12
Great post. Just what I
Great post. Just what I needed to work through my hungover today and do something constructive
Officially off the Pies bandwagon
sea-kem
Posts: 15247
Date Joined: 30/11/09
Bring Jamie back
Bring Jamie back
Love the West!
Stevo81
Posts: 1278
Date Joined: 16/04/12
Top stuff
Still tie all my assists like this. That YGK works a treat for melting the ends, other kevlars not so much
•••••••• Electrical Contractor NOR ••••••••
meglodon
Posts: 5981
Date Joined: 17/06/10
Great post and much appreciated
Thanks for the very informative and useful post.
Moist and Salty
Posts: 102
Date Joined: 28/10/14
It's also easy to tie a hook
It's also easy to tie a hook to both ends of the assist cord and loop the middle of the cord onto the solid ring creating two even hooks with less knots.
When making them this way try to have both hooks facing each other (I know it sounds counter intuitive but it increases hookup strength by allowing the hooks to grab the fish's lip from either side, instead of one hooked and the other facing away and swinging uselessly). This method also allows for rubber suids and/or glow beads to be added before the solid ring, the glow bead acts as an eye and gives the fish more confidence to strike as it thinks the fins will fold down as the "fish" goes down it's throat.
Last tip I'll add is to use thinner gauge and smaller hooks than you think are necessary when tying assists this way (especially when using assists at both ends of the jig like the pro's in Japan), since you can be confident at least two hooks will grab the fish, not only will they share the load, if one or more straighten or break you will still land the fish as there's more still holding.
The advantage to this is that the thinner gauge is more likely to get good penetration with less strike force, the better the penetration, the less torque the fish can apply to the hook (due to the deformation or the cord instead of the metal hook) so the thinner hook can be less likely to be damaged than a stronger hook with worse penetration depth.
Hope this helps
bristolio
Posts: 41
Date Joined: 19/01/16
Good thread heaps of info
Good thread heaps of info for newbys like my self and guys lookin to build up there own lures cheers
Septimus
Posts: 146
Date Joined: 14/11/10
LOVE THIS THREAD!!
Refer back regularly for updates and a refresher... Much appreciated.
Septimus
Posts: 146
Date Joined: 14/11/10
TWIN HOOKS
Updates like - twin hooks on single cord.